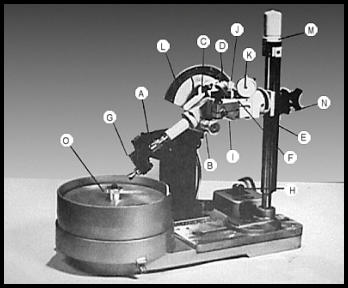
"A"
Dop arm (adjustable for concentricity to .00025 runout). The dop arm has a reference point for radial alignment.
This is a cone pointed set screw in the dop arm which corresponds to the groove in the dop for round stones.
"B"
Radial tooth index splitter: Knob is marked "R", "L", right and left turn.
"C"
Free wheeling pin. This pin, when inserted will allow the dop arm to be turned without the trigger engaging the index
gear. This allows the operator to round or preform the gem. The pin is removed to engage the index trigger with the
index gear.
"D"
Index gear.
"E"
Compounded Angle Pivot.
"F"
Quadometer Lock-Out Screw.
"G"
Auto-Curve. Marguise and oval attachment.
"H"
Solid state full wave rectified speed control.
"I"
Positive angle stop.
"J"
Micro-Angle Fine adjustment.
"K"
Quadrometer Pressure Gauge: For repeat pressure reading. Registers the pressure that the operator exerts on the
dop arm. The face of the dial can be adjusted or turned so that a light or heavy pressure can be registered. For a light
pressure the indicator at rest should read .001 to .002 minus the zero. For a heavy pressure .003 to .006 minus zero.
Pressure is then exerted by the operator on the dop arm until the indicator pointer reaches zero.
"L"
6" Protractor + 1/4" Vernier scale.
"M"
Micro Height Knob.
"N"
Coarse Height Adjustment.
"O"
Timken Precision Bearing Arbor Roller.
BASE B 69A PM Unit -- 70 inch ounces -- 0 to 1800 RPM -- Facet Head 11 lbs.
INSTRUCTIONS FOR ACCURA-FLEX FACET HEAD
Dop reference point or radial alignment: This is a cone pointed set screw in the dop arm 1 1/4" from the end of the collet
chuck. The purpose of this reference point is to radial align the grooved dops into a fixed position, i.e. the groove of the
dop corresponds with the cone point when the dop is inserted into the collet chuck.
The reference point (cone pointed set screw) is properly adjusted when the grooved dop will slide easily into radial
alignment. If the set screw is adjusted in too far then it will bind in the groove of the dop.
DO NOT adjust this set screw tight but only snug against the groove of the dop after inserting the dop into the chuck.
Before tightening the collet chuck turn the dop against the set screw. This will remove any error between the groove of
the dop to and the set screw. The gem is now cut after which the transfer from the original dop to another is executed.
The adjustable cone pointed set screws in the transfer block keeps the dops in proper alignment while the transfer is
accomplished. After transferring is completed, the new dop is inserted into the collet chuck so that the groove of the dop
and the cone point will correspond as previously mentioned. However, the direction that the dop must be turned to
remove error of the sliding fit must be reversed to that established before the transfer. This reversal in the rotation of the
dop is due to the fact that the relation of the gem to the reference point has been reversed through the transfer sequence,
i.e. if the original dop was turned clockwise against the reference point counter-clockwise. The reference point of the dop
arm also allows the operator to remove and then re-insert the dop and gem during any phase of the cutting or polishing
operation.
The cone pointed set screws in the standard transfer block are also adjustable with the long 5/65" allen set screw wrench.
These set screws will be properly adjusted when the dop will slide within the "V" way without any rotation. Important: Do
Not adjust these set screws too high as this will tend to interfere with the parallel alignment of the dops.
Radial tooth index splitter: Knob is marked "R", "L", right and left turn.
Free wheeling pin: This pin, when inserted, will allow the dop arm to be turned without the trigger engaging the index gear.
This allows the operator to round or preform the gem. The pin is moved to engage the index trigger with the index gear.
The index gear may be removed by loosening the allen set screw in the gear hub (use the 5/64" allen wrench). Note the
flat on the dop arm shaft. The allen set screw of the index gear must be tightened on this spot only.
Positive angle stop: To adjust, loosen black Tri-point of angle stop knob, move dop arm until desired angle reading is
noted on angle dial. Next, rotate angle stop counter-clockwise on pivot shaft until stop is in contact with Micro-fine angle
stop screw, then tighten black Tri-point knob.
Micro Angle Stop Fine Adjustment: Fine adjustment of the angle stop is accomplished by turning the knurled knob
clockwise -- plus (+) reading on the protractor -- or counter-clockwise -- minus (-) reading on the protractor.
H 71-A ACCURA-FLEX FACET HEAD WITH B69A BASE


Send mail to webmaster with questions or comments about this web site. Copyright © 2006-2026 Poly-Metric Instruments, Inc. All Prices Subject To Change Without Notice.